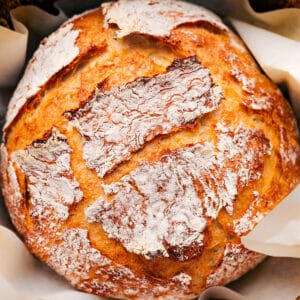
This artisan-style No Knead Bread Recipe uses simple ingredients and barely any hands-on work. I’m sharing all my go-to tips so you get amazing bread every single time.


author’s note
This No-Knead Bread Turns Anyone Into a Baker!
If you haven’t tried making bread yet, THIS recipe is the best place to start. Fair warning—once you make it, you might not want to go back.
I’m truly obsessed with this bread recipe. It’s not only delicious but also easy to make with very little hands-on time.
Here’s why it’s great:
- No stand mixer or bread maker needed
- No kneading required (very little hands-on time)
- Flexible baking/resting options so you can enjoy fresh bread when it works for you
- No special tools or utensils needed
- Simple ingredients and easy methods
This “miracle bread” recipe is based on Jim Lahey’s famous version from the New York Times.


What Is No-Knead Bread?
No-Knead Bread uses a long rise instead of kneading to build gluten for structure and texture.
When baked, this bread has a light, chewy interior and a crisp, crunchy crust. Its structure is surprisingly different from all-purpose white bread that relies on kneading.
No-Knead Bread Recipe Ingredients
| Ingredient | Notes |
|---|---|
| Warm water | Use the wrist test: drizzle a few drops on your wrist. If it feels warm and comfy, it’s right. Too hot or too cold and the yeast won’t activate. |
| Yeast | Helps the dough rise and expand. |
| Flour | Use plain all purpose white flour. |
| Honey | Helps the yeast grow and adds light sweetness. |
| Salt | Adds flavor and keeps the bread from tasting bland. |
| Olive oil | Helps the dough rise and adds a nice boost of flavor. |
Variations
I’ve tested this recipe with bread flour instead of all-purpose flour, and it gives better structure and shape due to its higher protein content. You can also try the herbed variation for added flavor with this Herb Bread.

Let’s Chat Yeast
Proofing the yeast shows it’s alive and active. Directions for both active dry and instant yeast are included—both work in this recipe.
Make sure the yeast activates before continuing. If not, the bread won’t rise properly.
Activated yeast will grow, foam, and look creamy.
-The yeast might be old.
-The water could be too hot or too cold.
-Your environment might be too cold.

No-Knead Bread Without A Dutch Oven
This bread is best baked in a hot 5.5 or 6-quart cast-iron Dutch oven pot. The pot creates steam to give the bread a crispy crust.
To bake without a Dutch oven:
- Place the dough on parchment paper and transfer it to a metal sheet pan.
- Position an 8-inch metal pan in the oven (do not use a glass pan), and bring a large pot of water to a boil.
- Place the sheet pan with dough in the oven and carefully pour the boiling water into the metal pan.
- Close the oven promptly to trap the steam.
- Bake for 40-50 mins until the bread is golden and sounds hollow when tapped.

How To Make No-Knead Bread Recipe (Tips)
- No Kneading: The dough is very wet, so avoid kneading or over-handling it.
- Cooling: Allow the bread to cool completely before slicing to prevent a spongey texture. The interior continues to cook even after it’s removed from the oven!
- Flour: Use either all-purpose or bread flour. Bread flour results in a chewier texture, but all-purpose flour is also effective.
Storage
Leftovers?
- This No-Knead bread recipe is best the first day.
- After a day, store it in an airtight container or bag. It softens, but is still good toasted!
- Freezing: Slice and wrap each slice individually. Freeze in an airtight bag or container for up to 3 months. Toast slices directly from the freezer.
Use Leftover Yeast In:
Breakfast
Homemade Cinnamon Rolls
Appetizers
Life-Changing No-Knead Dinner Rolls
Sandwiches
Honey Whole Wheat Bread
Lunch
Easy Focaccia Recipe
No-Knead Bread Recipe
Video
Equipment
- Cast-iron pot with lid 5.5-quart (or larger), see note 1
Ingredients
Instructions
- In a medium bowl, whisk together yeast, honey, and warm water. Let it sit for 5 minutes until creamy or foamy. If the mixture doesn’t foam, the yeast may be dead, or the water might have been too hot. Start again if this happens.
- In a large mixing bowl, mix together flour and salt using a rubber spatula. Add the yeast mixture to the flour mixture and stir until a shaggy dough forms with no dry flour streaks. Use the spatula to pull the dough to one side and drizzle in the olive oil. Turn the dough to coat it in the oil (it will be sticky). Cover the bowl fully with plastic wrap.
- Let the dough rest overnight at room temperature (around 70°F / 21°C) for 10–18 hours. For a quicker option, see note 4.
- Move an oven rack to the center position and preheat oven to 450°F (230°C). Place the cast-iron pot (with lid) in the oven to heat for 30 minutes.
- Sprinkle 1 tablespoon of flour on a clean work surface. Use a spatula to scrape the dough out of the bowl onto the floured surface. Sprinkle 1 more tablespoon of flour on top. Gently fold the sides inward with a spatula or dough scraper, making 6 folds to form a rough ball. Transfer the dough ball onto a large piece of parchment paper, flipping it upside down so the seam side is down. Gently shape it into a rough ball. (Optional: Score the top with 3–5 slashes if you have a lamé).
- Carefully remove the heated pot from the oven, lift the parchment paper with the dough, and place it into the pot. Cover with the lid and bake for 30 minutes. Then, remove the lid and bake an additional 12–18 minutes, until the bread sounds hollow when tapped in the center and the top is a deep golden brown.
- Carefully remove the bread from the pot using the parchment paper, and slide it onto a wire cooling rack. Let it cool for a full 30 minutes before slicing with a sharp serrated knife (see note 5).
Recipe Notes
Nutrition
Nutrition information is automatically calculated, so should only be used as an approximation.


I am struggling to get my dough to rise as my house is very cold (17degrees) any ideas how to get around this problem??
Try placing the covered dough somewhere a little warmer. I like to set it in the oven with just the oven light on (not the oven itself), which creates a gentle warm spot for the dough to rise. You can also place the bowl near a warm appliance like the fridge, dishwasher, or stove, or even on top of the refrigerator where it’s usually a bit warmer.